To give a new user limited access to Safeguarding, we will need to click the Add User Access button, in the User Access section.
If the User is someone who is already in our iKnow Safeguarding account, we will need to use the search bar to search for the relevant person in the system. We can search by typing their name and then selecting them from the list that appears.
If the User is someone who is not already in the system, we will need to click the Add Person button. We can then add the new person's details.
We can then decide the level of access we would like to give, and for which Categories, by switching the relevant toggles on.
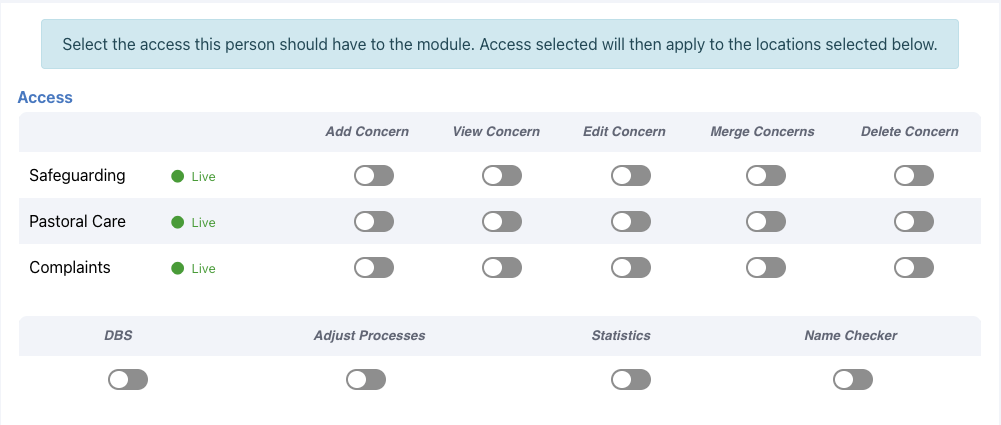
Giving a user access to Add Concern only, will allow them to add Concerns but they will not be able to see any other Concerns that have been added.
If we want a user to be able Add and View Concerns, we will need to switch on the View Concern toggle. They will not be able to make any changes to any Concerns.
If we switch on the Edit Concern option, the user will be able to Add and View Concerns, and they will also be able to make changes to existing Concerns.
If we enable the Delete Concern option, the user will be able to perform a soft delete of a Concern. This means that the Concern will be moved to the Archive list, which is only available to Account Safeguarding Leads. An Account Safeguarding Lead can then decide whether the Concern should be permanently deleted or restored.
If the DBS toggle is switched on, the user will have access to the Checks section of Safeguarding.
If the Adjust Processes toggle is switched on, user will have access to add and edit Processes for their locations.
If the Statistics toggle is switched on, the user will be able to see the Statistics area of Safeguarding.
If the Name Checker toggle is switched on, the user will be able to acces the Name Checker.
Any of these four toggles can be switched on without giving any access to Concerns. If we have a user who will be looking after the Checks only, we can switch on the Checks toggle, without switching on anything else. The user will only see Checks when they log in to iKnow Safeguarding.
In the Location section, we can choose to which locations the Safeguarding User’s permissions will apply. We will only be able to select from locations of which the User is a member.
If there are a lot of locations in our iKnow account, we’ll be able to use the search bar to find the correct location.
Once we’ve set all the permissions, we can click the Add User button and the user will be added to the list of people under User Access.
If we are adding a brand new User, who is not already in our iKnow Safeguarding account, we'll need to click the Add Person button.
We can then add the new person's details and allocate the necessary permissions and locations for that user.
If we want them to be sent an email with log on details, we'll need to tick the tickbox.
Clicking the Create User button will create the new user in our account.
We can view the permissions that have been given to a user by clicking the blue View button to the right of their name. If we need to make any changes to their access, we’ll need to click the orange edit button and to remove their access completely, we can click the red dustbin button.